Ride With GPS Rider Information Page

Information for Riders
Remember that you need to do the setup and downloading of your event/routes at home or someplace with cell service BEFORE you come to the ride. This of course will vary with the location of Base camp. RWGPS does not require cell service to operate during a ride- it only uses the phone’s GPS. You do need cell service to download the routes to your phone. You can use cell service in the ride area if it available; this opens up a couple of different views on the phone. Using cell service and the Hybrid map option does take a little more battery use.
Download the app on your phone in advance. You can also do this when clicking the ride invitation link that will be sent to you from the event organizer. All you need to navigate the ride is the Free version of RWGPS. You DO NOT need to buy an upgrade to navigate the event.
On your phone click the invite link that was sent to you via email from ride management. It will rsvp to the ride manager for you and ask you to sign in to your account or create one.
Create a RWGPS account if you don’t have one yet. note- if you already do have an account, you have to log in to your existing account at the prompt you get after clicking the invitation link. if you are already logged in you might have to re-click the ride invite and log in again.
Look for the Ride with GPS confirmation email that you are confirmed in the event. (You will enter your email in your RWGPS account when you register)
Update the settings on both your phone and in the RWGPS app on your phone. The instructions for both can be found at the bottom of this list.
Launch the app on the phone go to the home page.
Click on the events button.
If you want to confirm to the event organizer you are coming you can click the confirm button.
You should see the ride there listed with the different loops/routes listed in the correct order of the ride. NOTE- The routes might be listed in different order on your phone than you should ride them in. They will be labeled “XYZ ride, 50 mile ride, loop 1” then “Loop 2” or similar. When you begin to navigate a route you click the three dots Icon and select “start navigation” Be SURE you are starting the correct route.
Doing the actual ride
For the first loop click the three stacked dots on the right and select navigate.
It might ask you to allow ride with gps to use your location- select “allow while using app”
It will then start navigation on the first loop of the ride. Follow the little blue directional dot on the route and listen for the voice cues. You can navigate the trail by looking at the route on the phone screen, or by listening to the voice cues, or the best way is to do both.
Pro Tips! If you wander more than 165 feet off the course you may hear a warning sound. If you do, take a look at the phone screen to see if you are on course or not. You may hear the off-course alert while navigating switchbacks. Just peek at the screen to be sure you are on trail. You will hear the back-on-trail sound when you return to the trail.
To pause the ride you long hold on the pause button, the 2 vertical bars on the bottom of the screen. It will ask you if you either resume the ride, or finish the ride. Here you can either save the ride, or delete it. you are not deleting the event, just the ride you started. You can re-start the route at any time.
Ride voice cues
This is one of the more powerful features of RWGPS. You can actually follow the trail by listening to the voice prompts that are played out on your phone as you approach a turn or special obstacle. These turn prompts are helpful, but please remember they are not 100% foolproof. The route manager can make a mistake on the cue, or the prompt might be a little sooner or later on the trail than other cues. It’s an in-exact science in placing the prompts on the routes. When in doubt always take the phone and have a look at the screen. The route navigation is the best way to be sure you are on track. One nice feature on the phone screen is it will show you a nice little advance warning of the next upcoming cue, much like driving directions on your car’s gps. Once you make a turn, the next turn will be listed at the top of the screen, along with the distance to that next cue. Don’t worry if it says 2 miles or more- you can go a long ways without a turn.

Screen view:
There are several views on the phone app you can look at while navigating. The most popular are RWGPS (ride with gps), terrain, and Hybrid. Hybrid is the best since it lets you use one of the biggest features of the system. Your view on the phone of the trail you are riding is like Google earth. You actually see the ground you are traveling on. This is one thing that sets it apart from a traditional GPS.
To change the view on the page and to enable directional arrows you click the little icon that looks like a little stack of square pancakes. It will give you the following screen below.
Click on “directional arrows” under map options to show the route directional arrows. Click on the “Hybrid” icon under map type to show the google earth type view.

IMPORTANT NOTE ABOUT SCREEN VIEW! THE DEFAULT VIEW OF A ROUTE DOWNLOADED TO YOUR PHONE IS THE RWGPS (RIDE WITH GPS) VIEW. IT IS NOT THE GOOGLE EARTH-LIKE HYBRID VIEW. THE HYBRID VIEW REQUIRES CELL SERVICE SINCE IT TAKES A LOT OF BANDWIDTH TO RENDER THE GROUND IN PICTURES. IF YOU ARE NAVIGATING IN AN AREA THAT HAS CELL SERVICE, AND YOU WANT TO USE THE HYBRID VIEW, YOU NEED TO KEEP YOUR PHONE OUT OF AIRPLANE MODE. IF YOU ARE USING HYBRID, AND YOU LEAVE THE COVERAGE AREA, THE HYBRID VIEW MAY GET FUZZY, OR GO AWAY COMPLETELY AND REVERT BACK TO THE DEFAULT RWGPS. PICTURED BELOW ARE WHAT THE TWO IMAGES LOOK LIKE ON THE PHONE TO COMPARE.


Other Phone Settings Options
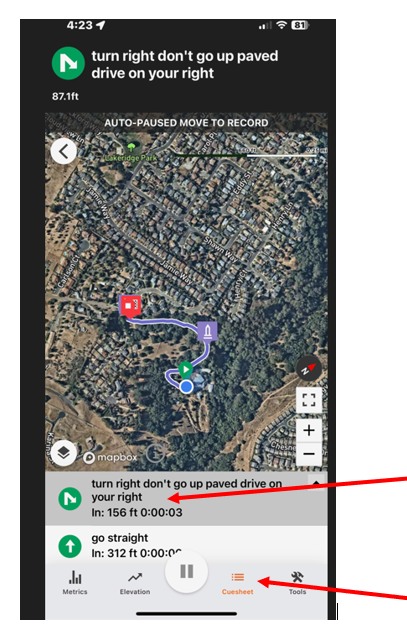
To see a list of upcoming voice cues on the phone you can click the little button on the phone screen called “Cuesheet” It will list out a printed version of all the voice cues for that route. You can scroll up and down to see all cues. See image below:
To turn off the voice cues you can click the “Tools” icon, then click the “Settings” button. at the next page you will click the “Navigation” link. Unselect the two options: “Audio Alerts” and “Spoken Alerts” These can be turned back on at any time. See images below:


3- Phone Settings for the Phone and the RWGPS phone app
RIDE WITH GPS APPLICATION SETTINGS (ON THE PHONE APP)
Settings on the phone app. From the main screen click “settings” Auto pause-ON
Logging:
Logging interval- 2 seconds
Auto pause- ON
Interval alerts:
Enabled- turned off
Tone- turned on
Type- set to distance
Interval spacing- set to .5 mile
Announcement content- there are some personal choice options here. Set distance and duration to Whole Ride.
Photos—all turned off.
Saving- all turned off
Navigation
Navigation chimes and Speech speed- your choice
Alert distance- set to normal
Advanced cue warnings: Important! Nearing cue warnings, Imminent cue warnings- all off.
Visual alerts, Audio alerts, Spoken alerts, Off-course alerts- all turned on.
Handlebar mode: keep screen on and Lock orientation- your choice.
Bluetooth and sensors- Barometric Elevation- turn on. The rest for Bluetooth are optional for you.
PHONE SETTINGS (ON THE PHONE ITSELF)
Phone settings
There are some settings on your phone that should be set. Please follow the instructions below for your type of phone. Do this prior to leaving your home data/Wifi service. The exact steps may vary slightly depending on the phone you use.
For Android Users:
Take the app off battery optimization: (the exact steps may vary from phone to phone)
1.Tap the Settings wheel on your phone
2.Tap on Apps & Notifications or possibly just Apps
3.Find RWGPS in the list and tap
4.Find battery and tap
5.Under that list it should detail Battery Optimization and Battery when in background
6.Set your RWGPS App to NOT be optimized. On the Samsung S-22 Ultra, the choices are Unrestricted, Optimized or Restricted choose Unrestricted. This will allow battery use in the background.
iPhone Users:(the exact steps may vary slightly depending on the phone you use)
1.Make sure your app has the correct location permissions
a.Open iPhone settings app
b.Scroll to Ride With GPS
c.Tap location
d.Choose While Using the App
e.Toggle on Precise Location